What are you trying to find???

Wednesday, September 29, 2010

DO THIS: ...Because you never make me cookies.

My husband and I have this joke... because I love cookies of any kind and always always want them, and he is not a bag fan. I'll have a cookie craving and start begging for cookies, and he will shake his head no, and then I say... "Z, You NEVER make me co-oo-okies!!!!" In the whiniest voice ever.
And it's true, he doesn't. But he always laughs at me when I say that to him. The only kind of cookies he will make are slice and bake from the store... which, despite Pillsbury's best efforts, still taste like the plastic tube they came in. (To those of you out there who think you are passing those things off as homemade... drop the charade. We all know. Most of us don't care and will eat plastic flavored cookies when the other option is no cookies, but please stop lying trying to say they are from scratch, so we can stop lying pretending to believe you.)
This is by no means a new or earth shattering idea... but was a small, AHA! moment for me the other day. While you are already in the mess of making cookies... double batch that thing! Then use your cookie scoop (or rolls balls of dough) to make a pan of cookies (unbaked) to pop into the freezer for a few mins to set up, then you can throw those things in a bag and store in the freezer for your next cookie craving.
Last night when Z got home, I showed him the bag of frozen, unbaked 'cookies' in the freezer, so the next time I whine, "...You NE-EH-VER make me cookies!" he can prove me wrong. Yay.

While we are on the topic of bags in the freezer, and the like... I may be behind the time here, but the ZIPLOC vacuum freezer bag has pretty much changed our life (and our food storage).
This thing is a freezer bag with a small valve built into the upper corner... and it comes with a hand pump. So you can basically vacuum pack ANYTHING you can fit in the bag. We have used it to store and freeze uncooked bacon and meats. Blocks of cheese (NO MORE MOLDY CHEESE! Which I know is... kind of a contradiction.). Coffee beans. Fruits and veggies. Leftovers. All kinds of stuff! 
It's a little bit pricier than our normal off-brand zipper bags, but we have already saved $$ from food that has not spoiled, so that makes it worth it. It's pretty great. And my husband gets a kick out of using it too, which means he occasionally helps put food away after a meal... so it's pretty much worth it's weight in gold.

Tuesday, September 28, 2010

SEW THIS: Puppy Hoodies

Something happened this weekend. Something that has been threatening for many months, but has never come to fruition... until now. This weekend my husband and I were shopping. I picked up an article that struck my fancy... looked at the price tag and said, "20 bucks for this? I could make this for nothing!" That's not the remarkable part of the story, because I have done that very thing about a million times before in my lifetime. The remarkable part is I went home... and I did it. I made it. Actually, I made two. It was a very big moment for me.
Here's how the story starts: When we took the boys for a walk Saturday, their dad mentioned it was getting cooler and soon it would be too cold to walk outside. The boys were horrified at that news. Walking is their absolute most favorite thing in the whole wide world... (although, snuggling with Dad is a close second.)

Ha! I just had to include that picture.
Anyway, we went to PetSmart later to buy dog food, and marched by a rack of doggie sweaters. I am generally against dressing dogs in clothes, but I started to consider because I would love to find a way to extend their walking season... and it gets super cold in the stupid mid-west. Anyway, that thing mention above happened, and there is no way I am paying 20 bucks a piece for my two dogs to have walking sweaters. Soooo... I went home, grabbed a pair of sweatpants out of my trash bin, and went to work. The result was not only successful and functional, but also pretty darn cute... AND did not cost me a thing, as all material came out of my 'trash' pile or scrap pile. I'm not only Dog Mom, I am SUPER DOG MOM. Whoo-hoo.

Aren't they cute? I love Winnie's modeling skills here...

Here's a tutorial for the hoodie, as modeled by Winston

Puppy Hoodie

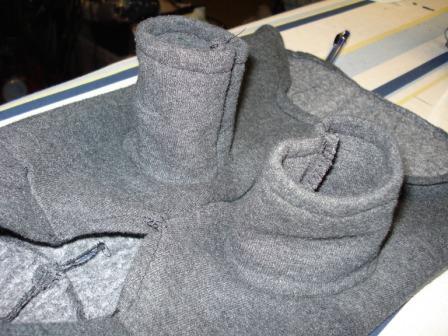
1) I started by pulling a pair of sweatpants and cutting them apart at the seams. Next I measured my Puppy: Around the neck, around the chest (behind the legs), and from base of the neck to the base of the tail.
2) Using your measurements, you will cut out this basic shape. (Yes, you need that part to cut up slightly in the back... especially if you have boy dogs, as you don't want the buggers peeing all over your sweatshirt.)
(My dog's measurements were neck 14 in, chest 20 in -- note how I allowed extra room for seam allowances, and comfort. And... larger around the neck, I didn't want it tight there.)

3) Next cut a rectangle for the hood. The neck should be 2-ish  inches shorter than the neck opening on the body (My rectangle was about 6.5x13), fold in half and round the upper corner closest to the fold.

With right sides together, sew along the top (curved) edge of the hood, clip curve. You can either fold under (hem) the front edge of the hood (opposite the fold) OR do what I did, sew on an extra 1" casing. (Sorry I don't have a good pic of this process. I cut a strip 2"x14" folded in half log ways with wrong sides together. Pinned and sewed with right side of hood to 'right' side of strip, flipped it out and ironed it flat.)
Pin bottom edge of hood to neck opening of body, right sides together, sew together.
(here's the corner/edge of my hood stitched to the neck opening of the body.)
4) Pin right sides together and sew just along the bottom 'chest' part of the body. (stop about 1.5 inches from hood, and at the bottom, where it cuts away:

The un-sewn space between the hood and chest, fold over a small hem, pin and sew down:

5) Next, add the 'sleeves'. My dogs legs measured 3.5" apart across his chest, so I knew I needed the sleeves to start there. Pick a round object approx the size of your dog's leg at the top (I used a roll of tape). Flip the hoodie inside out, lay flat (in half) and pin through both layers. Lay measure half the distance between the legs, then trace your object:

With halves pinned together (you might want to pin specifically around your armhole you have traced) cut through both layers to create your arm hole.

Measure around your round object... Mine was 7 in. Cut two rectangles 4"x7.5". Fold rectangles in half lengthwise with wrong sides together, and overcast along the long side. (I made a seam 1/4" in along the opposite side (fold) just because I thought it would look cooler, you can, you don't have to.)

Fold each in half again, matching the raw edges, pin and sew together.

Now, take the 'tube' you have made and turn the seam to the inside. Insert the sleeve into the arm hole you cut, right sides together.

Pin and sew in place. Repeat for the other sleeve...


6) Now add the pocket... I made a traditional 'hoodie' style pocket, but you could make whatever shape you want. I cut out my shape and ironed and sewed down the pocket openings:

Next I ironed down the three other sides (but not the bottom edge, because that will be part of the hem on the whole sweat shirt.) Center along back bottom of sweatshirt, pin in place and sew down.

7) I wanted to personalize mine... so I added a little felt letter at this point. Used applique technique from here, only I just did a normal stitch with my machine around the outer edge... nice and simple.

8) Turn up a 1/4" hem around the bottom edge (should be the only raw edge you have left...) Going around the curve was a little tricky for me, but the sweatshirt fabric is forgiving...

9) Almost done! One more quick detail: At the center, base if the hood, sew a large 'button hole'. (This will be to slip a leash through)

10) YAY! All done!
(Don't judge me for the messy basement in the background...)
Now find your pooch... and photoshoot!
Charlie's sweatshirt didn't have a hood... and he got a pocket with a C on it.
(I know the dogs look less than happy about this photoshoot... but they do like their sweaters, or didn't seem to mind them when we took them outside in the cool air for a walk. Here they are hacked because it was like, 1:30 and I woke them, to dress them and have a photoshoot. I am a bad mom. It's a good thing I only have dogs... and no kids.) Anyway... the sweatshirts turned out really cute, and even my mom, the REAL seamstress inspected them and said I did a passing job-- especially for having no pattern! Whoo hoo!
I hope this tutorial made sense... or at least enough to give you some ideas of what you can do on your own. I was pretty pleased that these cute new jackets came from trash bin sweatpants... Maybe I have challenged you to rethink a use for something in your trash bin... hmmm...

Sunday, September 26, 2010

SNEAK PEEK: Warmer Boys

When we took the boys for a walk today, their dad mentioned it was getting cooler and soon it would be too cold to walk outside. The boys were horrified at that news. Enter Dog Mom, who grabbed a pair of sweatpants out of the trash and extended their walking season by at least a couple weeks...

Full story to come soon...

Friday, September 24, 2010

LOOK AT THIS: Silhouette Giveaway! Are you kidding me?

Okay, I am not giving away a Silhouette (Sigh... if ONLY)... but PRUDENT BABY is! Can you believe it? Such a prize! Such generosity! Such wonder!

Think of all the options and inspiration if you got your hands on one of those things! The empowerment of resources of unimaginable craftiness! To push a few buttons and create this:

Vinyl decor
Or this:

Gorgeous cards and paper crafting

Or this:

Holy RHINESTONES, Batman!
Or... ridiculous endless options! Glass etching, heat transfers, scrapbooking... Swoon.
I have been lusting over one for quite some time now, but with the current school payment situation-- well, it ain't gonna happen for a LOOOOONG time. But to be so lucky as to enter a contest to WIN one? A giveaway? Someone might choose me to have one based not on merit or talent or need... (actually... I don't know how they are choosing the winner. I can only hope it will be an unbiased, random system that I can somehow rig to only select MY name as the winner... )
To check out more about this amazing machine go to the Silhouette Website and look around for a while. Be prepared to gasp at the amazingness. To learn more about this GIVEAWAY follow the link to the site. While you are there check out the Prudent Baby blog (I seriously enjoy it... all the random fun commentary and creative fun projects.)

Thursday, September 23, 2010

MAKE THIS: Pear Butter

Happy first day of FALL! It only seems appropriate to post something fall-like and that gets me thinking of pumpkins, leaves, apples... and apple picking... apple pie... (appletini?!) apple butter...
Ah, but alas, my apple butter days are over. Last fall I made the very last batch ever of "Val's Sassy Apple Butter". It just doesn't seem right to call it "sassy" anymore... and so the apple butter recipe was put to rest, at least for now. Do not fret, though. I have found a suitable replacement to satiate my butter making desires... It still involves things like this:
...and some of this:

...a little of this:

...AND an awful lot of these:


Are you tracking with me? We made a little pear butter. Okay, we made A LOT of pear butter (and by 'we' I mean... me. Because I had no helpers. Just me in a hot kitchen for the afternoon... oh, but it smelled like HEAVEN. Sweet floral pears, fresh ginger, lemon zest, fresh grated nutmeg, and just the faintest note of licorice-y anise. Indescribable how amazing it smells... it was nose nirvana! But I am getting ahead of myself here...)
It was the first time I have ever made pear butter, and I didn't want it to be an apple butter recipe with pears... all cinnamon and heavily cloved. Pears are much more delicate... and pair so nicely with ginger, I knew I needed to go a different route. I came across THIS recipe and was tickled to find someone with the same sentiment as I. However, I did not use her recipe exactly... most significantly I used about half the sugar she did. I didn't want candy... I wanted butter! And I amped up my ginger and nutmeg a little. 
Please, please, please do something for me. If you set out to make pear butter... spend a little extra for fresh ingredients... fresh squeezed lemon juice and zest (no bottled stuff, ew), whole nutmeg grated fresh, fresh ginger... you get the idea. SO worth it. Trust me.
Soooo... without further delay:

MRS. P's PEAR BUTTER
4 to 5 lbs chopped pears, do not peel or core them (remove any bruised or damaged parts)
1 star anise
3-4 Tbsp chopped fresh ginger
2 cups water
1 cup lemon juice
2 ish cups sugar
1/2 teaspoon ground cardamom
1 teaspoon ground nutmeg
1 teaspoon lemon zest
 
Put chopped pears, star anise, and ginger into a large pot. Add 2 cups of water and 1 cup of lemon juice. Bring to a boil, reduce to a simmer, cover, and cook until the pears are completely soft, anywhere from 25 to 40 minutes. Remove from heat.
Fish out and discard the star anise from the pear mixture. Ladle the pear mixture (liquid included) into a food mill (or if you are not blessed with a food mill, you can use a mesh sieve and a wooden spoon like I did. Your arm will be sore.) force the mixture through to a large bowl below. Discard remaining solids (seeds, stems, tough parts).
Measure the resulting purée, and pour into a large (8-qt), wide, thick-bottomed pan. For every cup of pear purée, add 1/4 cup of sugar. Stir to dissolve the sugar. Add the cardamom, nutmeg, and lemon zest. Taste and adjust seasonings if necessary. (I added quite a bit more nutmeg at this point... just because I am a little obsessed with the stuff.)
Cook on medium heat, stirring often to prevent the purée from sticking to the bottom of the pan and burning. Cook until the mixture is quite thick, and a small bit placed on a chilled plate is not runny. This can take anywhere from 45 minutes to 2 hours, depending on the size of the batch.
While the mixture is cooking, sterilize the jars for canning.
When the pear butter is ready, pour into hot, sterilized jars and seal, allowing for 1/4-inch head space between the pear butter and the rims of the jars. If you plan to store the pear butter outside of a refrigerator, follow proper canning procedures. Before applying the lids, sterilize them by placing them in a bowl and pouring boiling water over them. Wipe the rims of the jars clean before applying lids. Use a hot water bath for 10 minutes to ensure a good seal.

Makes 6 to 8 half-pint jars or ridiculously yummy pear butter.


Now... I need cute, creative ways to dress up half-pint jars, because I have 2 dozen of them that will make their way around this season mostly as gifts. Any ideas? (My ric-rac is a little lame, I know, don't judge me.)

Saturday, September 18, 2010

SEW THIS: Monogrammed Burp Cloths

Just when you thought we were done with babay showers... now everyone is having their baby!  And I know, I know, you just gave them a nice gift for their shower, but my parents always taught me never to show up empty handed, so it's nice to have a small token when you visit mama and baby in the hospital, or the first time you meet the munchkin.
And while you are giving them a gift anyhow... why not make it personal? I am pretty much obsessed with anything monogrammed anyway, so I very much enjoy monogrammed baby gifts.
I am pretty sure that everyone in blagland but me already knew about THIS fab little tutorial for burp cloths from 'homemade by jill' if you don't know about it... check it out, she's got a pattern and everything, and I basically used her pattern and tutorial, but added my own little flair. (You know how i feel about following directions...)
Here's how I did it...

I started by cutting out my fabric using her pattern. One side Is white flannel, one a cotton print, and they recommend putting a layer of quilt batting in the middle... but i didn't have any. What I did have... were a bunch of cloth diapers I had purchased for another project... so I cut several layers of those (about a 1/4 inch smaller than the other two) to use as my middle layer.
I wanted to add an initial for Baby Z, so I did so on the flannel side using the applique method HERE. I also added a pink ribbon that I just stitched down behind the applique.
 Next I lined up my fabric, flannel and cotton print with wrong sides together, and the diaper cloth/batting in the middle. Pin it all together.

 I sewed a double seam around the edge in a contrasting thread... for several reasons: 1) I think it looks cute 2) Because the edges will be fringed/frayed, I wanted to be extra sure it wouldn't fall apart. 3) I wanted to be sure that inner seam caught the inner fabric so it would move, and the outer seam closed it off so that inner fabric was not exposed.

Last I clipped all around the outside edge right up to the outer seam, (I didn't take a picture of this step...) then pop it in the wash and dryer to fray the edges.... And done!

I rolled mine and tied them with a ribbon and they are ready as a sweet little gift for Baby Z when I get to meet her (maybe?!) sometime next week! Yeah! :)

Thursday, September 16, 2010

EAT THIS: Irish Potato Soup

On Monday, we had our weekly girl's night, and it was my Good friend A's turn to make dinner. She delivered with a yummy thick potato soup. It was perfect for an evening just trying to put a bit of a chill in the air-- promise that fall will be here soon! I enjoyed it so much, I asked for the recipe, and it landed in my inbox yesterday. I plan to make it for dinner tonight... but thought I would share first so that you could do the same! Happy eating! YUM.

Irish Potato Soup

¼ C. Butter
2 Large Onions, finely chopped
1½ lbs Potatoes, peeled & diced (golden potatoes recommended)
Salt and Pepper
7 C. Chicken Stock
Fresh Chives for garnish

Melt the butter in a large pan. Add the onions, stirring to coat with butter. Cover and leave to sweat over low heat.
Add the potatoes, stirring to coat with butter. Salt and pepper to taste. Continue cooking, without browning, over low heat for 10 min.
Add chicken stock. Bring to a boil then simmer, uncovered for 20-30 minutes or until vegetables are tender.
Puree the soup in small batches in a food processor or blender until smooth. Serve hot with fresh chives to garnish.
(We like to add crumbled bacon and sour cream as well. I also thought a little more butter flavor would be good. And of course, good bread for dipping is a must!)
Enjoy : )

For Girls’ Night I doubled the potatoes and butter, but not the onions (they were pretty large onions, though). I also did not double the broth, just used enough to cover the veggies.

Tuesday, September 14, 2010

WE MADE THIS: Flower girl dress!

I recently got married... and we DIYed just about everything. (before you go getting impressed, let me temper that outrageous statement by pointing out that is was one of the most simple, understated weddings I have personally ever attended... but it was still beautiful, and thats why is worked.)
One of the many things that gave us sticker shock during wedding planning was flower girl dresses ("$200 for an 18 mos girl's dress??? Oh, HECK NO! There is not even an entire yard of fabric in that thing!") My mother is a very talented seamstress... so I started collecting pictures and handed them over to her. Here are my inspiration pics:


My mama sewed dresses for my sister and I when we were little, so I am pretty sure she was happy to take on this project. She confidently stated that we could make this happen.... and so armed with 40% off coupons we traveled to Hobby Lobby and bought a pattern and a couple yards of fabric to make a teeny tiny dress for our sassy little flower girl.


My Fabulous mama cutting out little dress pieces.

I may look as though I am enjoying myself here... but i was pretty unhappy about gathering that stupid skirt! I am not nearly the seamstress my mother is!


Naked dress

Completed dress. LOVE IT! I just get a kick out of the giant size flower... it was so sweet. :)


Like many 18 mo children... Charlotte wasn't thrilled about staying still for pictures... so all the pics we have of her are action shots! :)


Loved the way it turned out and the precious little girl who wore it!

(And for those of you wanting to know... Total Cost for this custom made dress: $19.00)
Yay!